

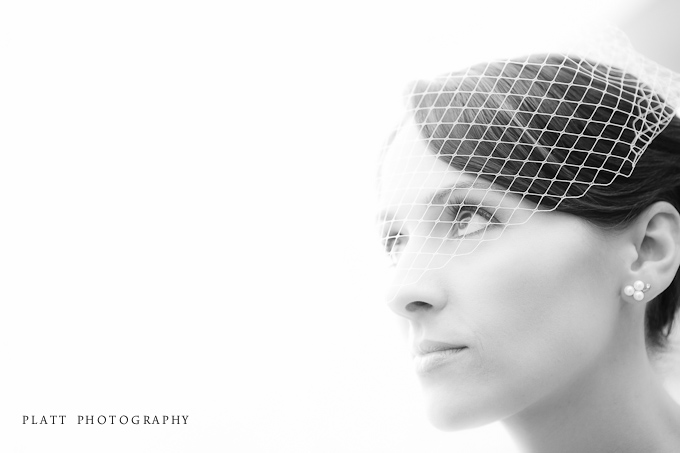

I was producing a seriese of 30 inch prints for Hype Parke Jewelers, for a bridal wedding event at the Biltmore in Phoenix, Arizona and obviously needed to enlarge the image from about 20 inches to 30. Shooting with the 5D Mark II, make enlargements a rare thing because the file is so big, but anytime I need to go beyond a 16×20, I need to do a little enlargement work on the image to make it work for the larger print. In the past, I used Genuine Fractals to enlarge my images and it did a fine job. Recently, Genuine Fractals was apparently purchased by OnOne Software and then renamed to Perfect Resize. I have been playing with it and while it does a god job, and actually does the math a lot faster than its predecessor, the interface is much, much slower. Which lead me to ask myself, “do I need to use a third party software for standard enlargements?”
So, I decided to do a test. I do a lot of tests… but I swear I do not have OCD. But my obsession, turns out to be to your advantage.
First, I enlarged this image in Photoshop with the Perfect Resize 7.1 plug in to 30 inches wide at 300 dpi. The results were acceptably good for the print. You will see on the image below, that the process of resizing an image tends to create a painterly texture, but when printed, that texture is generally swallowed up in the texture of the print surface and the grain patterns of the emulsion. So, I am pleased with the results and they will print nicely. But, remember, I had to open the image in Photoshop and run it through the Perfect Resize plugin or run it through the Perfect Resize plugin in Lightroom, which has a very slow interface.

Then I went back to Lightroom and simply exported the image from Lightroom and told Lightroom to enlarge the file to 30 inches at 300 dpi with a standard print sharpening added to the image on export. The process was a lot faster than dealing with the Perfect Resize interface and the results were just as good, if not better. If you look at both images on the dark pupil and iris of the eye, you will see more of a painterly texture with a bit more banding in the Perfect Resize enlargement above than you will in the Lightroom version below.

So I wanted to see if I could do it even better right our of Lightroom without using any other software or Plugins. And I promise, I am not OCD, I am just curious! So I added a bit of grain to the image in Lightroom. You can certainly see the grain in the image below, but observe what it has done in the pupil and iris area. No more weird patterns. I’m going to go with the added grain and no painterly patterns. It is far more beautiful and takes a fraction of the time to make the enlargement.

Now, this was a fairly simple enlargement from 20 to 30 inches. I am not saying that Perfect Resize is not a good tool for enlargement, it is very good, and indispensable when it comes to extreme enlargements, but for the day to day enlargements, I find that Lightroom does a fantastic job all on its own. So I will trust Lightroom to make the enlargement and save my time for the more important things in life.
Now, I’m off to help my son solve an particularly hard level on Angry Birds.
For a step by step lesson on what I did to get these results in Lightroom, see the Lightroom Podcast below.
Making Photo Enlargements in Lightroom 3 from Jared Platt on Vimeo.
There are plenty of plugins and photoshop methods for enlarging photographs beyond their native size, but Lightroom 3 can match or beat even Genuine Fractals or Perfect Resize on standard every day enlargements.
In this video you will learn how to use Lightroom to enlarge your digital images without the use of Photoshop or a Plugin.
Photography Details
Photography by Jared Platt, Platt Photography
Subject: A Bridal Portrait
Location: The Inspiridor in Chandler, Arizona
Love it. Thanks for this post. I just realized I shot some images at a lower resolution than I ultimately needed to end up with on the PRINT side… and I was wondering what affect Lightroom’s enlargement process had on them. thanks for this!
md
Lightroom does a good job at increasing resolution in export but if you need to increase sizes dramatically, I suggest onOne Perfect Resize.
Thanks for the info, I’m new to the resizing thing and I wasn’t sure how to go about it without losing detail. Until I get that D800 of course. 🙂